Make A Not-So-Spooky Ghost with HTML & CSS
Braydon Coyer / October 31, 2020
6 minute read
•
--- views

Get in the Halloween spirit (ha 👻) by making this not-so-spooky ghost with some HTML and a few lines of CSS!
Open up your favorite IDE or follow along on CodePen!
Here's the final result:
Before I begin, I like to consider the end-result in terms of shapes, and how I'm going to structure the markup in a way I can utilize CSS to get the results I want.
Let's think it through:
- The ghost has a capsule-like body
- The ghost has two round eyes
- The ghost has two round dimples
- The ghost has some circles at the bottom to give the effect of a wavy-bottom of the body
- A shadow is present at the bottom of the ghost to aid in the hovering effect
Each of these items can be translated to divs with appropriate class names applied.
1<div class="ghost">2 <div class="ghost__eyes"></div>3 <div class="ghost__dimples"></div>4 <div class="ghost__feet">5 <div class="ghost__feet-foot"></div>6 <div class="ghost__feet-foot"></div>7 <div class="ghost__feet-foot"></div>8 <div class="ghost__feet-foot"></div>9 </div>10</div>11<div class="shadow"></div>Now that we've created the structure (markup) of the ghost, let's start styling.
Let's first define some color variables that we'll use throughout the article.
1$background: #00034b;2$white: #ffffff;3$grey: #dbdbdb;4$pink: #ffbeff;5$shadow: #000232;Now that we have the colors defined, let's work on the ghost body.
1.ghost {2 //13 position: relative;4 width: 150px;5 height: 225px;6 background: $white;7 //28 box-shadow: -17px 0px 0px $grey inset, 0 0 50px #5939db;9 //310 border-radius: 100px 100px 0 0;11}Let's consider the styles above:
Even at this early stage, we can assume that we're going to need to position elements absolutely in the future, so we set the ghost's body as the anchor point. This will help us later.
Did you know you can use multiple box-shadows on the same element? Well, now you do! The box shadow is doing two things. First, it's giving us the grey inner shadow inside the ghost body (which is why we set it to
inset). Second, we can use it to give us a nice glow around the ghost.How do we get the capsule-like design without effecting the bottom of the element? The
border-radiusproperty can take optional arguments so you can change the radius of different sides of the element.
With these styles applied, we get the following result:

Let's now look at (ha 👀 ) the eyes of the ghost.
Because I'm using SCSS to style, I have the ability to nest my styles.
1&__eyes {2  //13  display: flex;4  justify-content: space-around;5  margin: 0 auto;6  padding: 70px 0 0;7  width: 90px;8  height: 20px;9
10  //211  &:before,12  &:after {13    content: "";14    display: block;15    width: 15px;16    height: 25px;17    background: $background;18    border-radius: 50%;19  }20}
A few things to note about the styles above:
I've decided to use the
ghost__eyesdiv as the container for both eyes. This means I'll position this container appropriately inside the ghost body.What about the actual eyes? Instead of created a div for each individual eye, I've decided to use Pseudo-Elements and style them appropriately. This helps reduce unneeded markup.
We've got some eyes now!

Let's take the same approach with the dimples and use Pseudo-Elements for the dimples.
1&__dimples {2  display: flex;3  justify-content: space-around;4  margin: 0 auto;5  padding: 35px 0 0;6  width: 130px;7  height: 20px;8
9  &:before,10  &:after {11    content: "";12    display: block;13    width: 15px;14    height: 15px;15    background: $pink;16    border-radius: 50%;17  }18}
We're making some good progress! Let's now make the bottom of the ghost by creating a few circles and positioning them correctly.
1&__feet {2  width: 100%;3  //14  position: absolute;5  bottom: -13px;6  //27  display: flex;8  justify-content: space-between;9
10  &-foot {11    //312    width: 25%;13    height: 26px;14    border-radius: 50%;15    background: $white;16
17    //418    &:last-child {19      background-image: linear-gradient(to right, $white 55%, $grey 45%);20    }21  }22}
Remember how we set
position: relativeup above in the ghost body? Here's they payoff. We want to place these feet at the bottom of the ghost body, soposition: absoluteis our friend here.The feet need to be side-by-side and flexbox is one way to achieve that.
Because there are 4 feet total, each foot should take up 25% of the given width.
Finally, we target the last foot and use
linear-gradient()to change the background color fromwhitetogreyin the middle of the element. This continues the illusion of the inner shadow that we set in the ghost body.

Our little ghost is pretty much done! Let's quickly style the shadow! There's nothing fancy going on here, we apply the color, size and position correctly.
1.shadow {2 background: $shadow;3 width: 150px;4 height: 40px;5 margin-top: 50px;6 border-radius: 50%;7}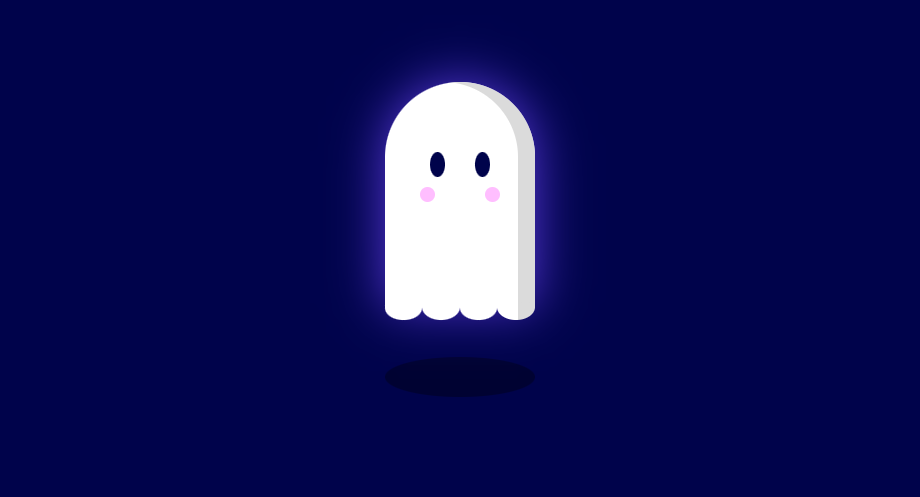
To wrap up, let's bring this little guy to life by using CSS animations!
Back up where we styled the ghost body, include an animation property. We'll create the actual keyframes animation next.
1.ghost {2 ...3 animation: float 2s infinite4}Next, define a keyframes animation called float. At the beginning and end of the animation (0% and 100%), the ghost should be at the initial starting position. Half way through the animation (50%), we want the ghost to be positioned slightly above the starting position.
1@keyframes float {2  0%,3  100% {4    transform: translateY(0);5  }6
7  50% {8    transform: translateY(-15px);9  }10}
Great! The ghost now floats up and down and repeats infinitely!
To make the floating illusion more convincing, we can apply another animation on the shadow itself!
Add an animation property to the styles on the shadow.
1.shadow {2 ...3 animation: shadow 2s infinite;4}And finally, define a keyframes animation that changes the scale of the shadow element.
1@keyframes shadow {2  0%,3  100% {4    transform: scale(1);5  }6
7 50% {8 transform: scale(0.9);9 }10}And there we go! CSS Art is always so much fun to make and it's a great way to challenge yourself and learn new things.
Happy Halloween!
Thanks for reading! If you liked this article and want more content like this, read some of my other articles and make sure to follow me on Twitter!
Articles delivered to your inbox!
A periodic update about my life, recent blog posts, how-tos, and discoveries.
As a thank you, I'll also send you a FREE CSS tutorial!
No spam - unsubscribe at any time!